Logto is an Auth0 alternative designed for modern apps and SaaS products. It offers both Cloud and Open-source services to help you quickly launch your identity and management (IAM) system. Enjoy authentication, authorization, and multi-tenant management all in one.
We recommend starting with a free development tenant on Logto Cloud. This allows you to explore all the features easily.
In this article, we will go through the steps to quickly build the WeChat (Native) sign-in experience (user authentication) with Nuxt and Logto.
Prerequisites
- A running Logto instance. Check out the introduction page to get started.
- Basic knowledge of Nuxt.
- A usable WeChat (Native) account.
Create an application in Logto
Logto is based on OpenID Connect (OIDC) authentication and OAuth 2.0 authorization. It supports federated identity management across multiple applications, commonly called Single Sign-On (SSO).
To create your Traditional web application, simply follow these steps:
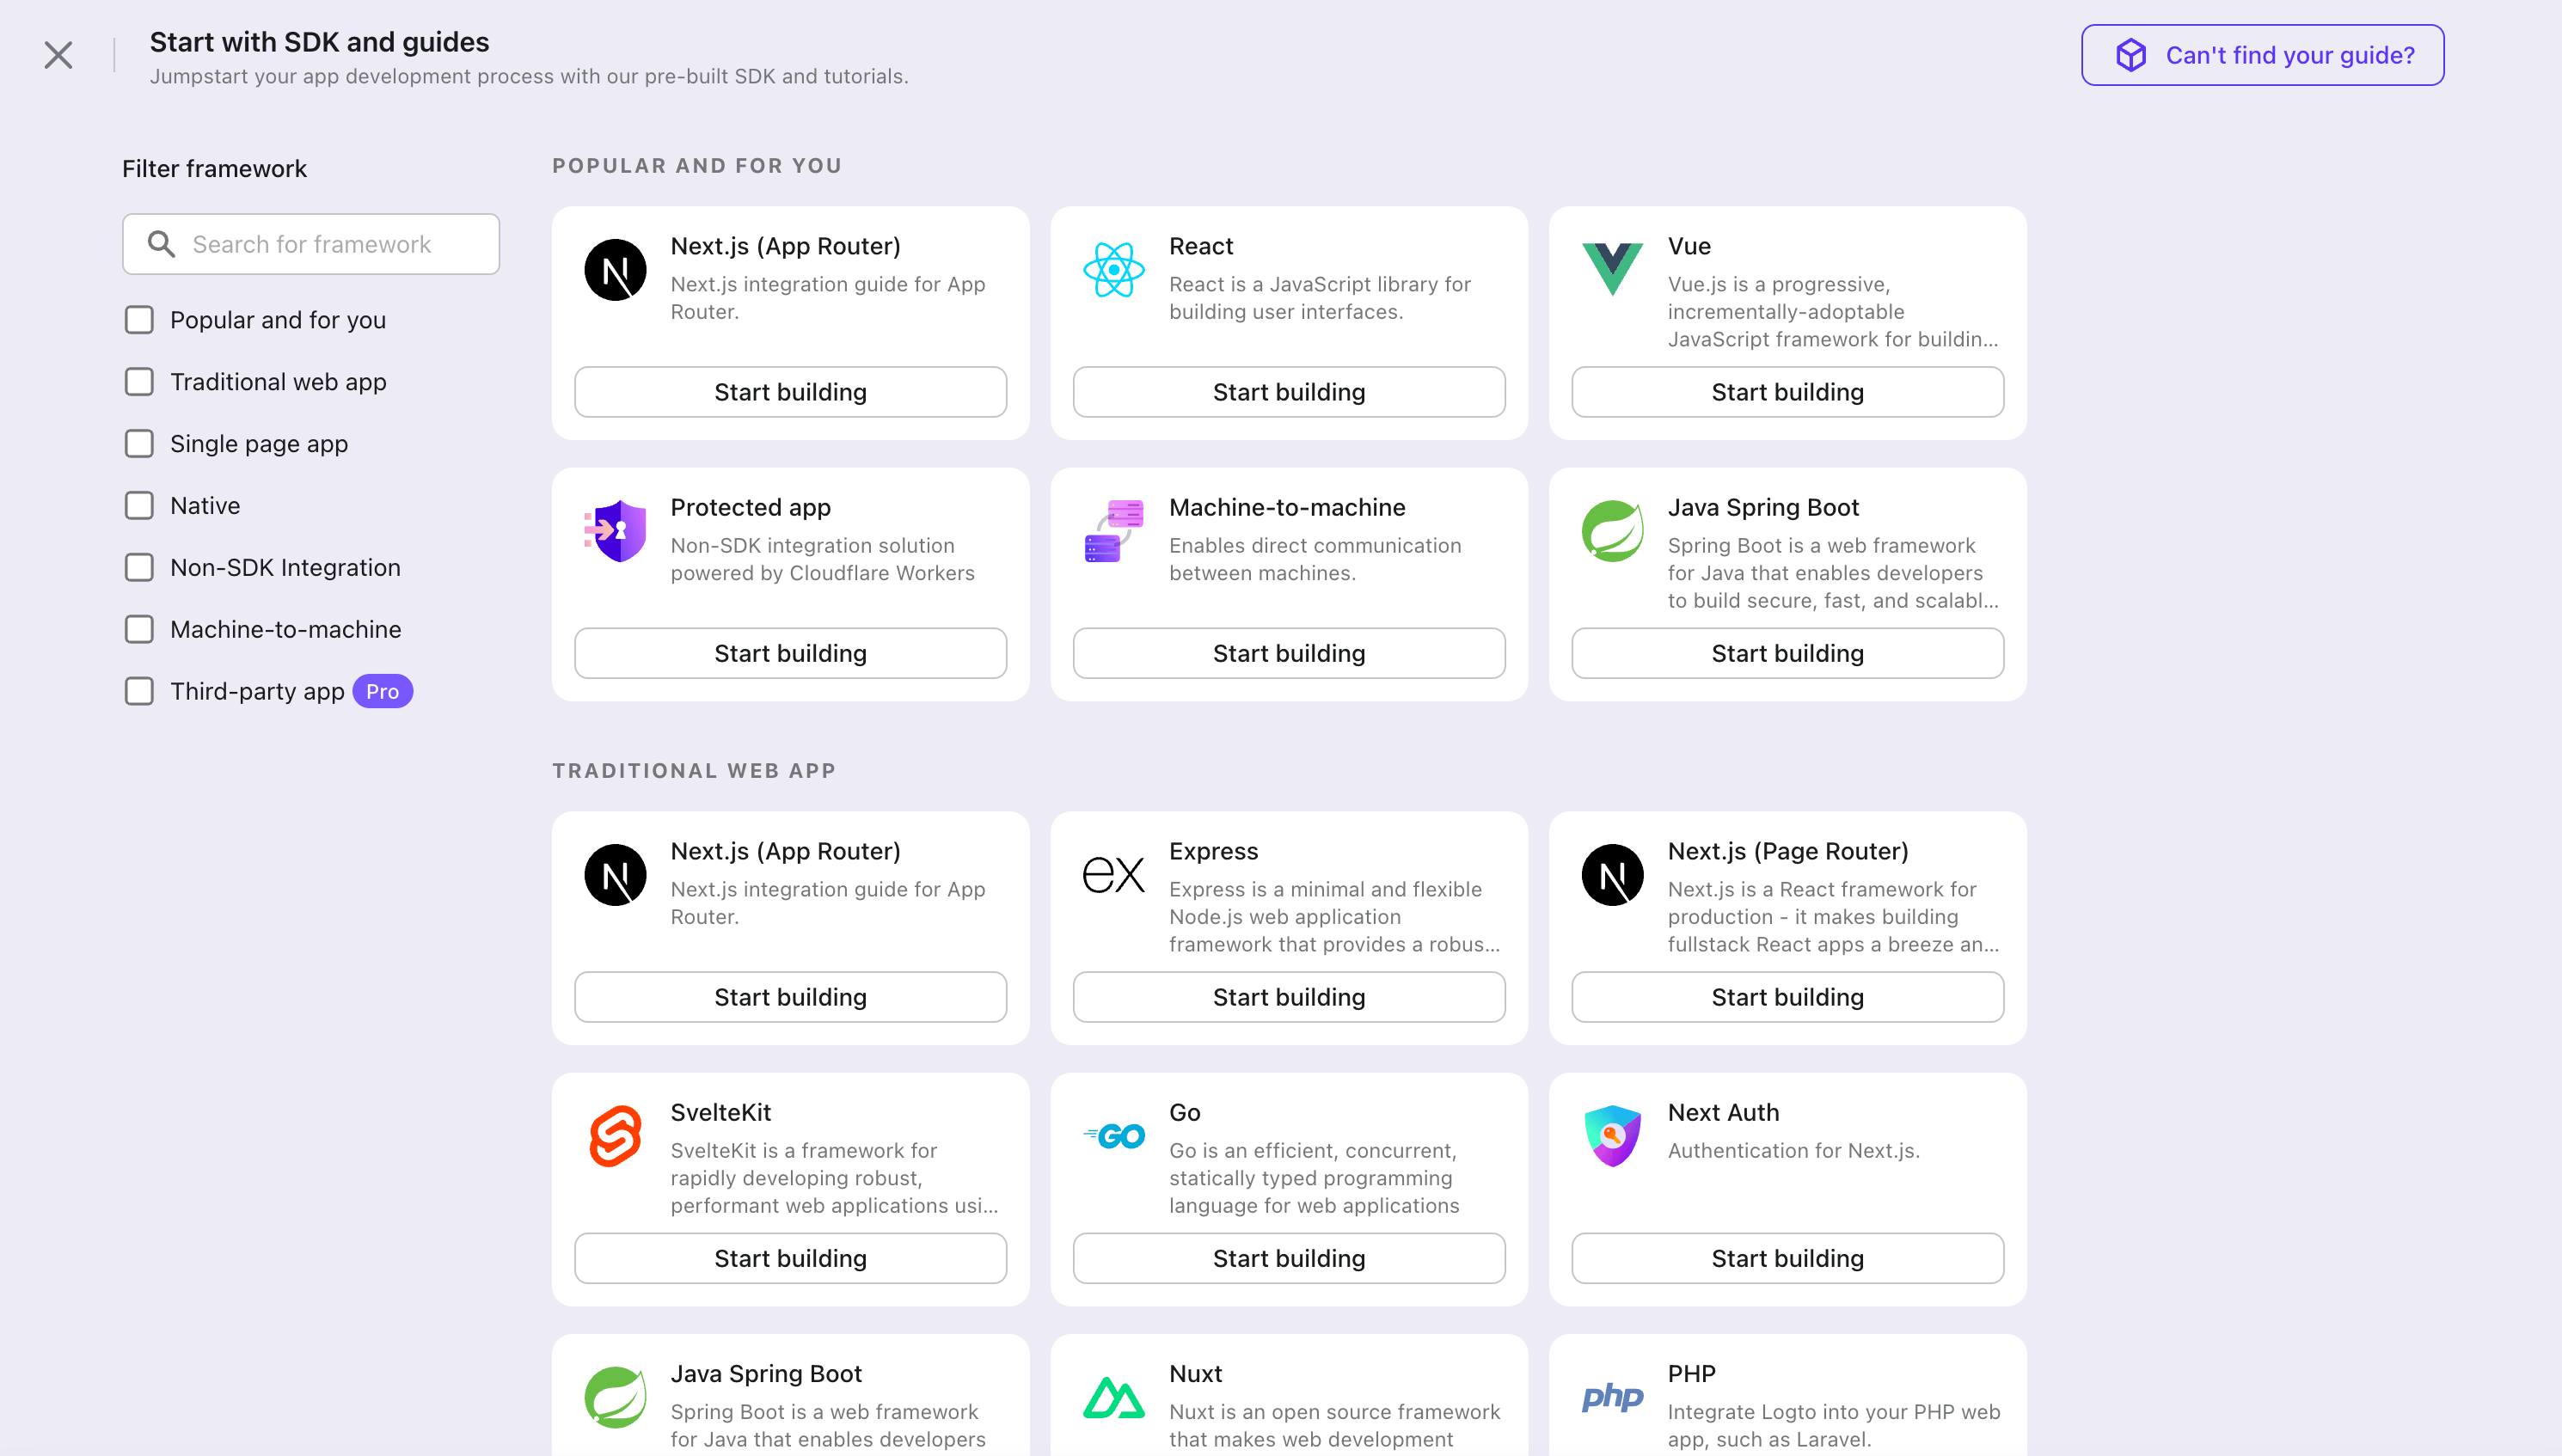
- Open the Logto Console. In the "Get started" section, click the "View all" link to open the application frameworks list. Alternatively, you can navigate to Logto Console > Applications, and click the "Create application" button.

- In the opening modal, click the "Traditional web" section or filter all the available "Traditional web" frameworks using the quick filter checkboxes on the left. Click the "Nuxt" framework card to start creating your application.

- Enter the application name, e.g., "Bookstore," and click "Create application".
🎉 Ta-da! You just created your first application in Logto. You'll see a congrats page which includes a detailed integration guide. Follow the guide to see what the experience will be in your application.
Integrate Nuxt with Logto
- The following demonstration is built on Nuxt 3.10.2.
- The sample project is available in the GitHub repository.
- Logto Nuxt SDK requires server-side rendering (SSR) to work properly. For single-page applications (SPA), check out our Vue SDK.
Installation
Install Logto SDK via your favorite package manager:
- npm
- pnpm
- Yarn
npm i @logto/nuxt
pnpm add @logto/nuxt
yarn add @logto/nuxt
Integration
Register Logto module
In your Nuxt config file, add the Logto module and configure it:
export default defineNuxtConfig({
  modules: ['@logto/nuxt'],
  runtimeConfig: {
    logto: {
      endpoint: '<your-logto-endpoint>',
      appId: '<your-logto-app-id>',
      appSecret: '<your-logto-app-secret>',
      cookieEncryptionKey: '<a-random-string>',
    },
  },
  // ...other configurations
});
Since these information are sensitive, it's recommended to use environment variables (.env):
NUXT_LOGTO_ENDPOINT="<your-logto-endpoint>"
NUXT_LOGTO_APP_ID="<your-logto-app-id>"
NUXT_LOGTO_APP_SECRET="<your-logto-app-secret>"
NUXT_LOGTO_COOKIE_ENCRYPTION_KEY="<a-random-string>"
See runtime config for more information.
Configure redirect URIs
Before we dive into the details, here's a quick overview of the end-user experience. The sign-in process can be simplified as follows:
- Your app invokes the sign-in method.
- The user is redirected to the Logto sign-in page. For native apps, the system browser is opened.
- The user signs in and is redirected back to your app (configured as the redirect URI).
Regarding redirect-based sign-in
- This authentication process follows the OpenID Connect (OIDC) protocol, and Logto enforces strict security measures to protect user sign-in.
- If you have multiple apps, you can use the same identity provider (Logto). Once the user signs in to one app, Logto will automatically complete the sign-in process when the user accesses another app.
To learn more about the rationale and benefits of redirect-based sign-in, see Logto sign-in experience explained.
In the following code snippets, we assume your app is running on http://localhost:3000/.
Configure redirect URIs
Switch to the application details page of Logto Console. Add a redirect URI http://localhost:3000/callback.

Just like signing in, users should be redirected to Logto for signing out of the shared session. Once finished, it would be great to redirect the user back to your website. For example, add http://localhost:3000/ as the post sign-out redirect URI section.
Then click "Save" to save the changes.
Handle callback
There's no additional setup needed to handle the callback route. When registering @logto/nuxt module, it will do the following:
- Add three routes for sign-in (
/sign-in), sign-out (/sign-out), and callback (/callback). - Import two composables:
useLogtoClientanduseLogtoUser.
These routes are configurable via logto.pathnames in the module options, for example:
export default defineNuxtConfig({
  logto: {
    pathnames: {
      signIn: '/login',
      signOut: '/logout',
      callback: '/auth/callback',
    },
  },
  // ...other configurations
});
Check out the type definition file in the @logto/nuxt package for more information.
If you configure the callback route to a different path, you need to update the redirect URI in Logto accordingly.
Implement sign-in and sign-out
Since Nuxt pages will be hydrated and become a single-page application (SPA) after the initial load, we need to redirect the user to the sign-in or sign-out route when needed. To help with this, our SDK provides the useLogtoUser() composable, which can be used in both server and client side.
<script setup lang="ts">
  import { useLogtoUser } from '#imports'; // Add this line if auto-import is disabled
  const user = useLogtoUser();
</script>
<template>
  <!-- Simplified button for sign-in and sign-out -->
  <nuxt-link :to="`/sign-${ user ? 'out' : 'in' }`"> Sign {{ user ? 'out' : 'in' }} </nuxt-link>
</template>
Checkpoint: Test your application
Now, you can test your application:
- Run your application, you will see the sign-in button.
- Click the sign-in button, the SDK will init the sign-in process and redirect you to the Logto sign-in page.
- After you signed in, you will be redirected back to your application and see the sign-out button.
- Click the sign-out button to clear token storage and sign out.
Add WeChat (Native) connector
To enable quick sign-in and improve user conversion, connect with Nuxt as an identity provider. The Logto social connector helps you establish this connection in minutes by allowing several parameter inputs.
To add a social connector, simply follow these steps:
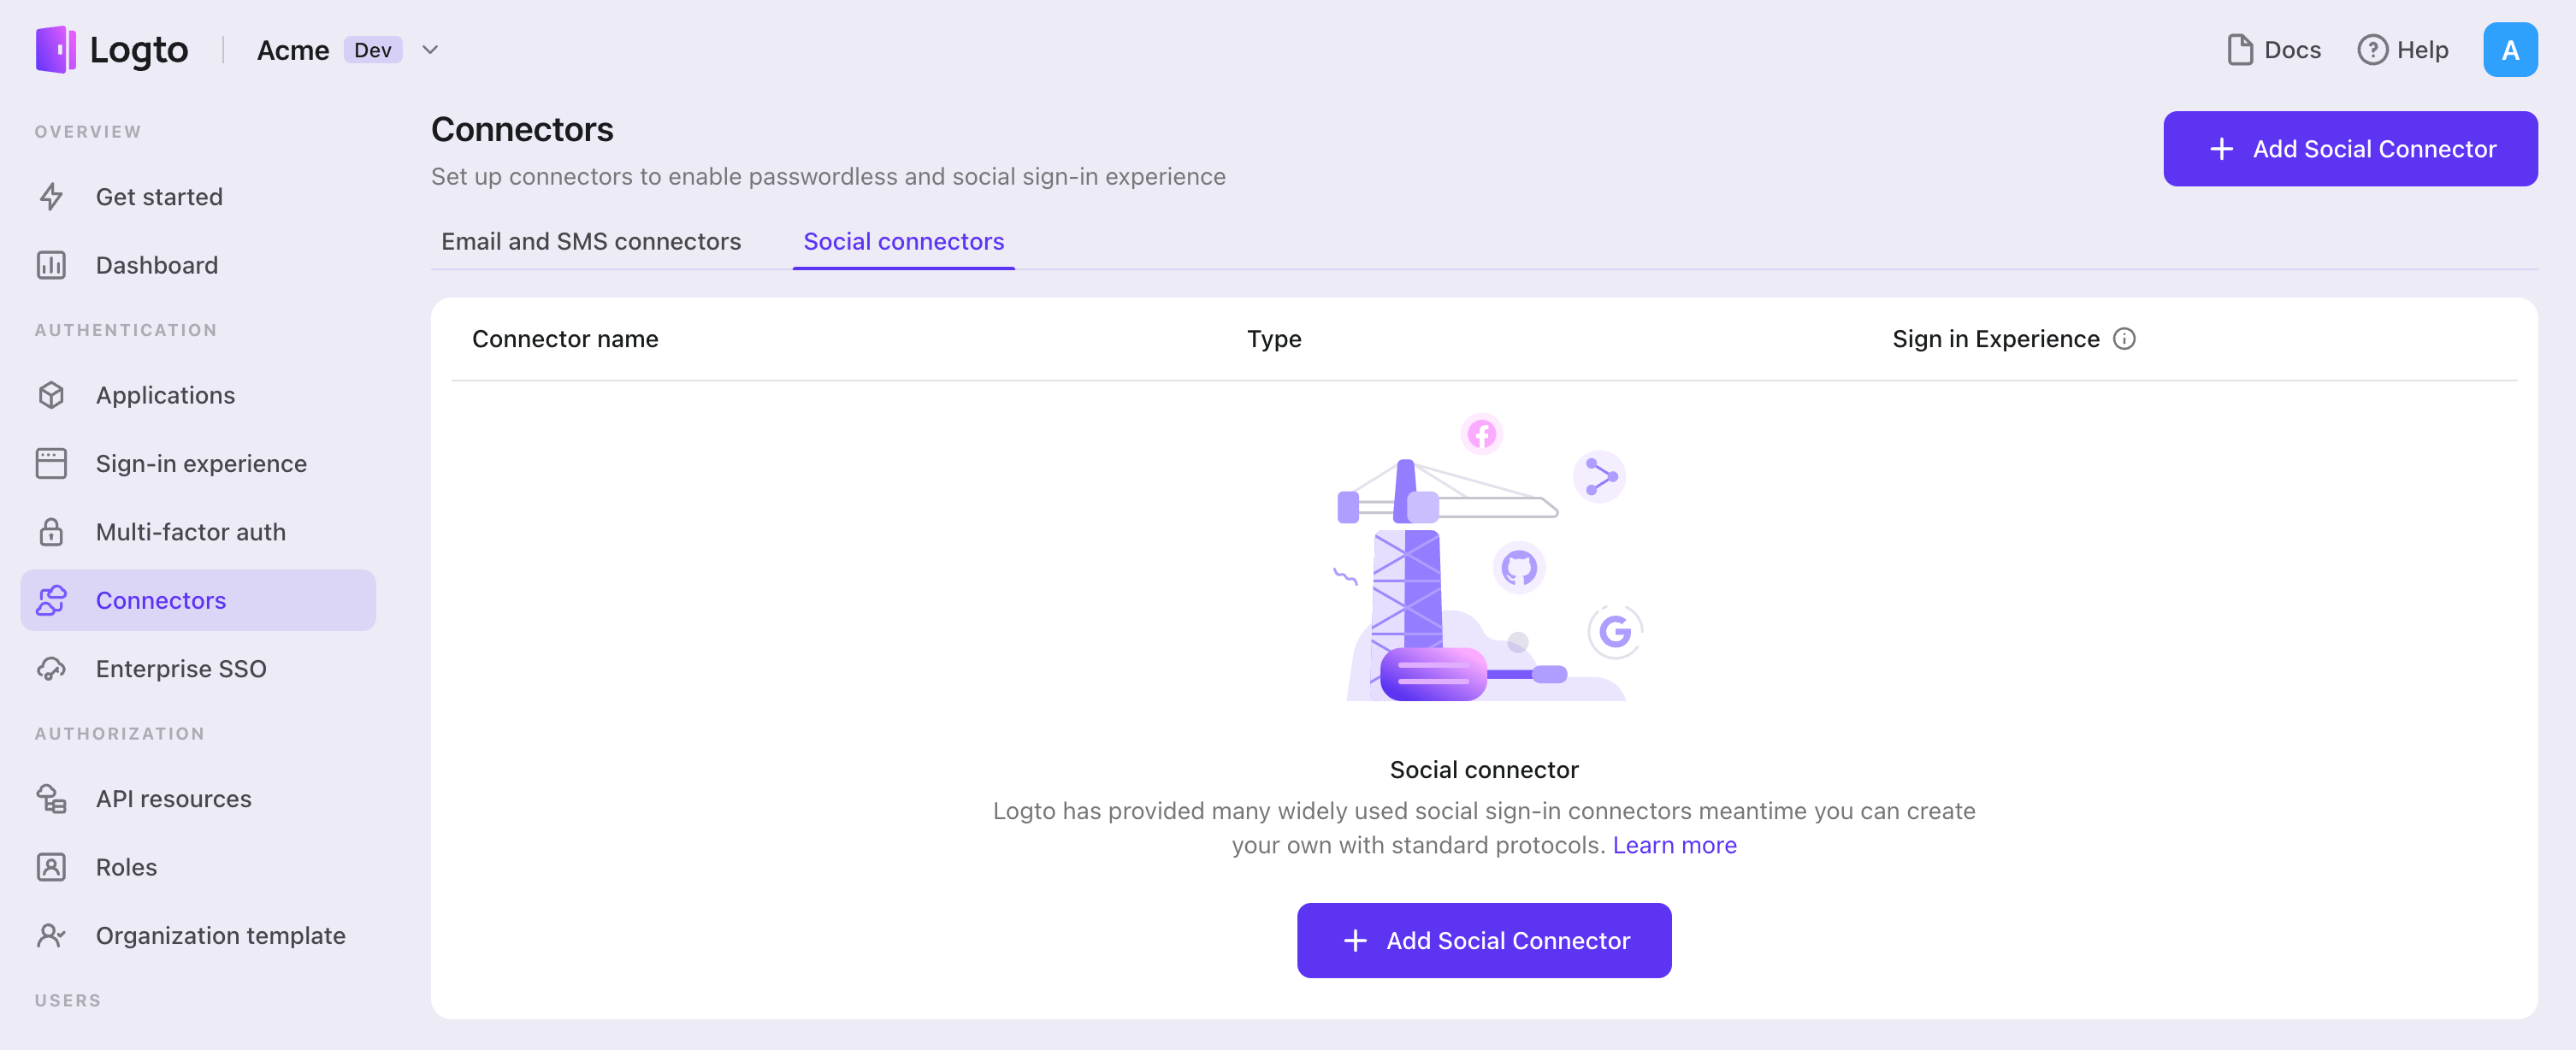
- Navigate to Console > Connectors > Social Connectors.
- Click "Add social connector" and select "WeChat (Native)".
- Follow the README guide and complete required fields and customize settings.

If you are following the in-place Connector guide, you can skip the next section.
Set up WeChat mobile app
Create a mobile app in the WeChat Open Platform
You can skip some sections if you have already finished.
Create an account
Open https://open.weixin.qq.com/, click the "Sign Up" button in the upper-right corner, then finish the sign-up process.
Create a mobile app
Sign in with the account you just created. In the "Mobile Application" (移动应用) tab, click the big green button "Create a mobile app" (创建移动应用).

Let's fill out the required info in the application form.

Basic info
Most of them are pretty straightforward, and we have several tips here:
- If you just want to test WeChat sign-in and the app is not on the App Store, in the "App is available" section, choose "No" to skip the "App download link".
- The "App operation flow chart" looks tricky. From our experience, you need to prepare a simple flowchart and several app screenshots to improve the possibility of passing the review.
Click "Next step" to move on.
Platform info
You can configure one or both iOS and Android platforms to integrate Logto with WeChat native sign-in.
iOS app
Check "iOS app" (iOS 应用), then check the target device type of your app accordingly.

If you chose "No" for the App Store availability, you cloud skip filling out the "AppStore download address" here.
Fill out Bundle ID, Test version Bundle ID, and Universal Links (actually, only one link is needed 😂).
Bundle ID and Test version Bundle ID can be the same value.
WeChat requires universal link for native sign-in. If you haven't set up or don't know it, please refer to the Apple official doc.
Android app
Check "Android app" (Android 应用).

Fill out Application Signing Signature (应用签名) and Application Package Name (应用包名).
You need to sign your app to get a signature. Refer to the Sign your app for more info.
After finish signing, you can execute the signingReport task to get the signing signature.
./gradlew your-android-project:signingReport
The MD5 value of the corresponding build variant's report will be the Application Signing Signature (应用签名), but remember to remove all semicolons from the value and lowercase it.
E.g. 1A:2B:3C:4D -> 1a2b3c4d.
Waiting for the review result
After completing the platform info, click "Submit Review" to continue. Usually, the review goes fast, which will end within 1-2 days.
We suspect the reviewer is allocated randomly on each submission since the standard is floating. You may get rejected the first time, but don't give up! State your status quo and ask the reviewer how to modify it.
Enable WeChat native sign-in in your app
iOS
We assume you have integrated Logto iOS SDK in your app. In this case, things are pretty simple, and you don't even need to read the WeChat SDK doc:
1. Configure universal link and URL scheme in your Xcode project
In the Xcode project -> Signing & Capabilities tab, add the "Associated Domains" capability and the universal link you configured before.

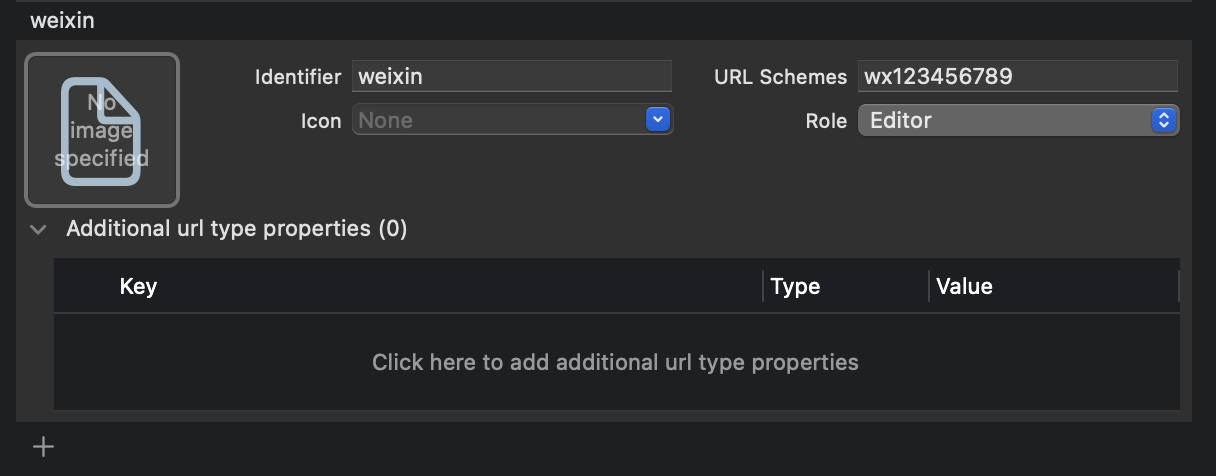
Then goes to the "Info" tab, add a custom URL scheme with the WeChat App ID.

Finally open your Info.plist, add weixinULAPI and weixin under LSApplicationQueriesSchemes.

We know these actions are not very reasonable, but this is the minimum workable solution we found. See the magical official guide for more info.
2. Add LogtoSocialPluginWechat to your Xcode project
Add the framework:

And add -ObjC to your Build Settings > Linking > Other Linker Flags:

The plugin includes WeChat Open SDK 1.9.2. You can directly use import WechatOpenSDK once imported the plugin.
3. Add the plugin to your LogtoClient init options
let logtoClient = LogtoClient(
  useConfig: config,
  socialPlugins: [LogtoSocialPluginWechat()]
)
4. Handle onOpenURL properly
The function LogtoClient.handle(url:) will handle all the native connectors you enabled. You only need to call it once.
// SwiftUI
YourRootView()
  .onOpenURL { url in
      LogtoClient.handle(url: url)
  }

// or AppDelegate
func application(_ app: UIApplication, open url: URL, options: /*...*/) -> Bool {
  LogtoClient.handle(url: url)
}
Android
We assume you have integrated Logto Android SDK in your app. In this case, things are pretty simple, and you don't even need to read the WeChat SDK doc:
1. Add Wechat Open SDK to your project
Ensure the mavenCentral() repository is in your Gradle project repositories:
repositories {
  // ...
  mavenCentral()
}
Add the Wechat Open SDK to your dependencies:
dependencies {
  // ...
  api("com.tencent.mm.opensdk:wechat-sdk-android:6.8.0")  // kotlin-script
  // or
  api 'com.tencent.mm.opensdk:wechat-sdk-android:6.8.0'   // groovy-script
}
2. Introduce WXEntryActivity to your project
Create a wxapi package under your package root and add the WXEntryActivity in the wxapi package (Take com.sample.app as an example):
// WXEntryActivity.kt
package com.sample.app.wxapi

import io.logto.sdk.android.auth.social.wechat.WechatSocialResultActivity

class WXEntryActivity: WechatSocialResultActivity()
// WXEntryActivity.java
package com.sample.app.wxapi

import io.logto.sdk.android.auth.social.wechat.WechatSocialResultActivity

public class WXEntryActivity extends WechatSocialResultActivity {}
The final position of the WXEntryActivity under the project should look like this (Take Kotlin as an example):
src/main/kotlin/com/sample/app/wxapi/WXEntryActivity.kt
3. Modify the AndroidManifest.xml
Add the following line to your AndroidManifest.xml:
\<?xml version="1.0" encoding="utf-8"?>
\<manifest xmlns:android="http://schemas.android.com/apk/res/android"
  package="com.sample.app">

  \<application>
    \<!-- line to be added -->
    \<activity android:name=".wxapi.WXEntryActivity" android:exported="true"/>
  \</application>

\</manifest>
Save your configuration
Double check you have filled out necessary values in the Logto connector configuration area. Click "Save and Done" (or "Save changes") and the WeChat (Native) connector should be available now.
Enable WeChat (Native) connector in Sign-in Experience
Once you create a social connector successfully, you can enable it as a "Continue with WeChat (Native)" button in Sign-in Experience.
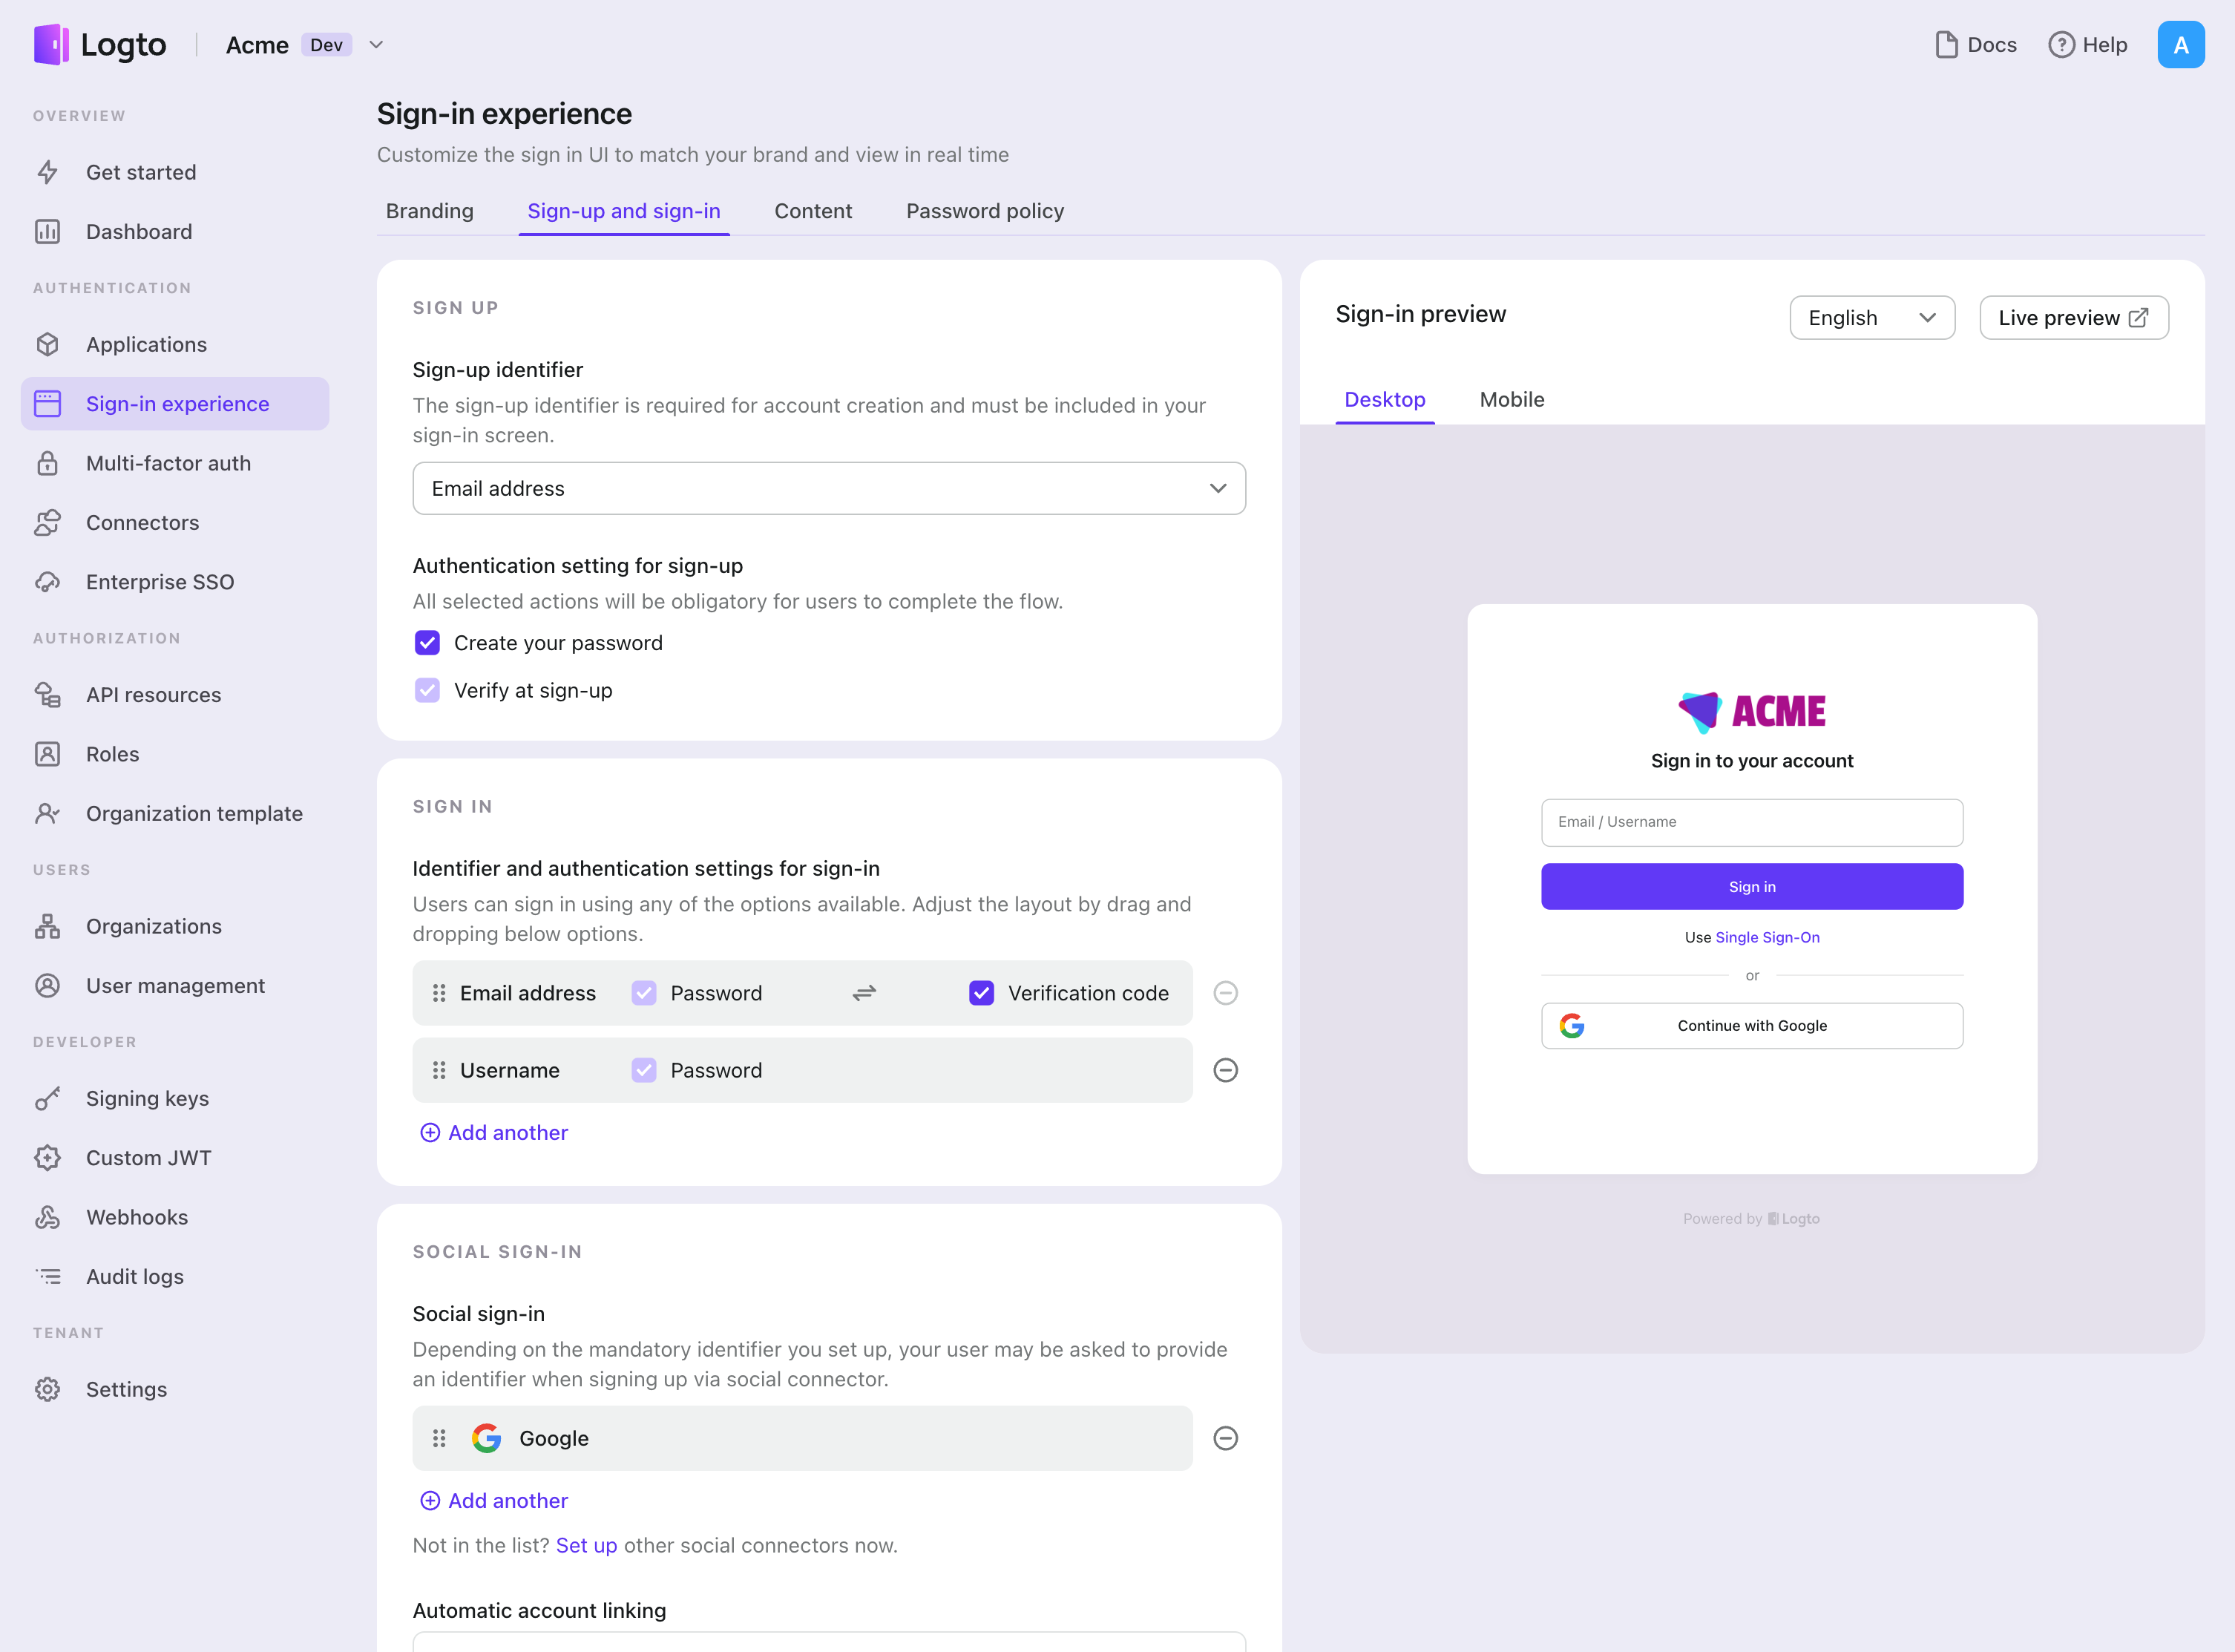
- Navigate to Console > Sign-in experience > Sign-up and sign-in.
- (Optional) Choose "Not applicable" for sign-up identifier if you need social login only.
- Add configured WeChat (Native) connector to the "Social sign-in" section.

Testing and Validation
Return to your Nuxt app. You should now be able to sign in with WeChat (Native). Enjoy!
Further readings
End-user flows: Logto provides a out-of-the-box authentication flows including MFA and enterprise SSO, along with powerful APIs for flexible implementation of account settings, security verification, and multi-tenant experience.
Authorization: Authorization defines the actions a user can do or resources they can access after being authenticated. Explore how to protect your API for native and single-page applications and implement Role-based Access Control (RBAC).
Organizations: Particularly effective in multi-tenant SaaS and B2B apps, the organization feature enable tenant creation, member management, organization-level RBAC, and just-in-time-provisioning.
Customer IAM series Our serial blog posts about Customer (or Consumer) Identity and Access Management, from 101 to advanced topics and beyond.